Spare room makeover

As promised, I have finally finished taking pictures of my spare room makeover which I’ve been dying to share with you. It is going to become my craft room, where I will have a place for all my yarn, toy fibre, fabrics, sewing machine, buttons, crochet hooks, knitting needles and little nick knacks that only I appreciate. My little space where I can be creative and make a mess without having to tidy it away before dinner time. I’m so excited!

bedroom pre decorating

Here is the room in its original state when we viewed the house. It adjoins another bedroom separated only by a wobbly wall made of chipboard that didn’t even reach up to the ceiling. We took the wall down and got a handyman in to create a proper wall with built in storage cupboards for each room. The following photos show how it looked after the wall addition, and before I started painting it last week.

IMG_5422


The window wall has not been rendered, so it has a bit of a prison cell feel to it with the brick. To make matters worse, its painted dark brown, which closes the room in. The other walls are gyprock. I don’t like the terracotta floor tiles, but they extend all through the ground floor and would be too expensive to change, so I have to work with what I have to try and detract from them and brighten things up. I have removed the curtains and had a roller blind put in instead to allow more light in.

IMG_5425

This photo is looking back towards the door, see the new built in cupboards! They made such a difference. And below is the room all painted white! What do you think?

spare room makeover

Painting that brick wall was serious hard work. I had to use a brush to get the paint into each gap between the bricks. It took forever. I still have a long way to go to get the room ready for crafting. The dart board is my son’s and it is staying for now, I quite like playing too, so I am happy to share. I made some bunting to decorate the wall. I used denim from old jeans I cut up and saved, and some nice beige cotton I had already, and some blue striped fabric I picked up from Lincraft in the sale at next to nothing. Another blogger mentioned adding some red fabric in, which I did and it made all the difference.

bunting fabric

I am pretty hopeless at sewing and had to re-learn how to use the sewing machine again, but even I could manage to make bunting. I was really impressed with myself. Plus, its such a thrifty way to decorate a room.

beachy bunting

I’m really happy with how its all looking, and we actually spend time in there now. Before it was dark and dingy, and a bit of a junk magnet. Now its bright and cheery and being used. I can’t wait to get my craft stuff in there. It will double up as a guest room so I will have to keep it tidy. That might be the next challenge.

spare room makeover

Have a great week, hope the sun shines!


My blog anniversary

This sort of crept up on me. My blog anniversary was actually yesterday! I knew it was coming up, but we went away last week, and the in-laws are still here visiting, so I’ve really been off the ball with blogging lately. I have made no plans for celebration as yet, but in the meantime I thoughtI would reflect on the past year and what we have achieved here in my little corner of the world. My first ever post a told of our exciting plans for our tree change, and how we might actually do this one day. I remember being so nervous when I hit the publish button. Here we are one year later already 6 months into our new life in the country.

view of the country

Our change has made us the proud owners of 10 acres, a house, a dam, 14 chickens, a dog and a ride on mower.

acreage life

IMG_4939

The girls like helping dad do the ‘farm jobs’ as they get to ride in the trailer

acreage duties using ride on mower and trailer

We have experienced floods, snakes in the house, 96% humidity and the hottest nights ever. No cold weather yet though, which is lovely as I mind the cold terribly.

flooded land, sunshine coast

carpet python in the kitchen

The python that turned up in our kitchen

It has been hard work, managing the land by clearing the lantana that bordered the entire fringe of our property. We are almost there with it now and hope to get a few head of cattle soon, perhaps 4, and see how we go. We built a chicken coop, adapted from an existing outbuilding that was previously an animal shelter. This was serious hard work, hammering in endless nails in the heat of summer. I built the door! And it hasn’t fallen off yet!!

chicken coop

Now we are reaping the rewards as our lovely chickens are finally providing us with eggs, averaging 8-9 a day at the moment.

free range chickens

fresh free range eggs

collected fresh today, lovely eggs

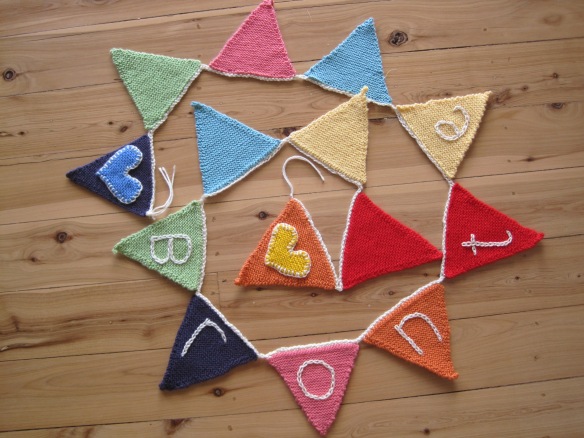
It has been a great experience, with more adventures to come. I am hoping to get back into a proper routine with blogging, and visit all the lovely blogs I like to follow more regularly. I seem to spend my days doing chores and errands, leaving little time for anything else. I think its time for change of a different kind, and focus on why we actually left the city and came here in the first place. I really must get that veggie patch growing! I also really want to continue with my craft too. I have had a few projects materialise over the past year. Some of the most viewed posts are the recycled t-shirt crochet basket and a toadstool, super cute knitted mini toys, and the knitted bunting.

crochet project

half finished basket with cut up t shirt yarn

crochet toadstool

knitted toys

A rainbow of cuties

knitted bunting

Some of my favourites have of course been the tapestry crochet dishcloths and the crochet snake!

crochet snake

crochet snake finished

tapestry crochet dishclothsI have only achieved 48 posts in the past year, but its nice to look back and see just how much you can do in one year.

A big thank you to all my lovely followers and commenters. I do love your comments and enjoy visiting all your blogs. I love the endless source of motivation and inspiration I get from reading all your posts. Here’s to another year of blogging!

Progress…

I can’t believe it has been two weeks since my last post. The time has just disappeared in a cloud of paint fumes and dust sheets, and that pretty much sums up my house at present. We have made the last mad push to get the house tarted up for sale. We are now in limbo land, waiting for a new carpet, some new blinds and trying to paint the last bits of woodwork to finish off. Thanks to all of you for your ideas on my last post about brightening up the laundry wall. I was inspired by the idea of framing some fabric, but decided to use paper instead. On my lunch break at work I nipped into hot dollar and found some nice wrapping paper and three cheap picture frames, and framed the paper in each one to create a trio of artwork. I scrubbed off the stickers on the washing machine and dryer so it all looks tidier in there now.

laundry with trio of artwork on wall

With all this rain lately there has even been some progress in the veggie patch, and we saw our first head of broccoli appear on one of the plants. Such excitement! (sorry about the blurry photo).

broccoli bud

The lonely lettuce is doing well too. I was tempted to harvest it tonight for dinner, but the kids wanted it to grow a bit bigger.

IMG_4193

My littlest one and I planted some butterfly flower seeds back in april. These have given us a wonderful display so far with more to come. They were sown from a pack of fothergills seeds for kids to grow a flower garden to attract the butterflies. Of course I was not thinking this through, having just created a veggie patch. Needless to say we have been plagued by a few caterpillars from the white cabbage butterfly.

flowers

Flowers looking a bit bedraggled from all the rain

I bought some Jamie Oliver greenhouse kits from woollies the other day as they are selling them off now at 2 bucks each. Bargain! The kids are growing cress, chives, coriander and basil, all the sends came with the kit, so very good value. My basil in the garden died, so I am hoping for a good crop from these seeds.

cress and seedlings

Sadly my knitting needles and crochet hook have been replaced with paint brushes and rollers these past two weeks, so nothing has been done there. I did buy this little stash of fabric offcuts the other week which I am hoping to use to make some owls, or some babushka dolls.

fabric samples

All this renovating has left me pretty exhausted I must say. I am in need of some R&R so my plan is to do a little bit of crochet, something small and not too taxing.

Bye for now!

T x

A budget makeover

Now I am no carpenter. I’m not so great at DIY either, but I had a vision of something I wanted, but could not justify the budget for. We recently renovated our laundry and downstairs bathroom on a tight budget. I am very happy with it, except for the mirror, which we did not replace. Now against the smart new tiles and bright new paint, the mirror just looks wrong. Old, dated and the screws along the metal frame, which I never noticed before, are now glaringly obvious. Not wanting to chuck out an otherwise good mirror I decided I would build a white frame for it. How hard could it be?

new bathroom with old style metal frame mirror

new powder room, old mirror in need of an upgrade

My husband was not convinced. I told him I would get some architrave from bunnings and custom make a frame to sit over the top of the mirror, thus hiding the offending metal frame. He humoured me, saying it was a good idea, but mentioned the fact that we didn’t have any appropriate power tools for the job, and warned me that the hand saw I planned to use would not produce a ‘clean edge’ and was highly likely to be unstable and result in a lot of jolting during sawing and therefore result in a bad job. I decided to ignore his warnings and plough ahead regardless, saying ‘can I at least just give it a go, if it doesn’t work you can say I told you so’.

bathroom shot with white framed mirror above sink

My DIY efforts made a new frame for the mirror out of budget materials

After an hour of measuring and sawing (its quite hard work – no wonder they invented power tools) I had my frame ready to assemble. I assembled, filled the gaps in the joins (they were not perfect, but not bad for a beginner) then gave it a couple of coats of paint. Then fixed it over the old mirror. I was very happy with the result. Much better. Even my husband was impressed, saying it looked as if it had always been there. So all up it cost me 16 bucks. A new mirror would have been at least 50 bucks, with visits to several shops to get what I was after. Half way through the project when things we not going to plan, I was ready to throw in the towel and go ‘sod it, lets just go to Ikea’ but I soldiered on. Not bad for a weekend project, in between rushing off to soccer games and kids parties. I feel like Tara off Better Homes and Gardens!

Now I need to brighten up the new laundry. I love the clean lines and newness of it, but its a little bit bland. Any suggestions for cheering it up – some wall art? Photo frames? As you can see we did this on a small budget – no money for plumbing or electrics, just a cosmetic job. I did hang a crochet heart on the door, but it looks a bit lost…

laundry

new laundry with bare wall in need of some decoration